Thursday, September 3, 2015

F-35 Build (Part 3)

So, I have completed the F-35 some time ago, it has just been a very busy summer and I haven't gotten around to posting the blog. When I left off last time, I just had the flaps to drop, and the cockpit to finish before painting. Those were done rather quickly. To tint the canopy I sprayed a thin mixture of 3 parts Tamiya Clear Yellow and 1 part Tamiya Smoke. I think it made things look pretty good. Once the canopy was glued on and had dried I masked it off to prepare for the paint job.
 

The first thing I did after masking was prime the entire model with Alclad II black primer and then a coat of Alclad Gunmetal. This would darken the Gunship Grey color and add little more contrast to the grey panels later. After the Gunship Grey went on the fun part began. I painted the dielectric panels Model Master Navy Agressor Grey and then masked off all the panel lines and painted them FS36231.  Amazingly, I only had to touch up these areas a little bit. (Up to this point I pondered doing an F-35A and C version as well, but I've decided that I don't like masking that much.)

After the greys were on, there was a bit too much contrast and so I sprayed a very thin coat of Gunship Grey over the whole thing to blend the shades a bit. Then the usual high gloss coat, decals, a light wash and a light coat of flat finish because this is a brand new plane with brand new paint and little weathering.


Lastly, the landing gear, gear doors, engine exhaust hatches, and weapons were put in place and the model was finished. I set out to show that with a little bit of skill and ingnoring much of the instructions, this could be a very nice model, and I think I at least did that.

Thursday, October 16, 2014

F-35 Build (Part 2)

One of the areas of the model that I felt needed some detailing was the exhaust nozzle area. I first cut apart the three sections of the duct in order to reposition it to a 45 degree(ish) angle. Then I glued the section halves together to give me the three rotating sections of the exhaust nozzle.


I also added a bulkhead and visual blocks to the aft section of the lower-rear fuselage half and a couple of structural struts and wires to the top half basing it from photos of the F-35B in take-off. It is not an exact replica of the real thing, but it does close up the gaping hole in the back of the model.
 

To give a little more realism, I added some "accessories" to the engine; not much because the bulkhead will hide most of them, but just enough to make it look like the engine has actual plumbing and wiring.
 
Once the majority of the scratch building was complete, I painted the visible interior bays and intake ducting Gloss White. I have decided to deviate from the instruction's build sequence when it came to the intake ducting because I wanted to get the smoothest seams in the most visible places. This meant that before painting the parts white, I glued part C15 to the upper fuselage and sanded out the seam. The way the parts are engineered, part C16 should just fit into place when I assemble the rest of the intake structure later. Lots of test fitting left me very confident in that.

I then painted the engine, exhaust nozzle and cockpit tub and then started assembling the pieces. I put the nose gear well in the forward-bottom piece, cockpit in the upper- fuselage half (I removed the locating pins on the nose wheel well connecting it to the cockpit piece), and main gear wells in the lower-rear fuselage half. Then I glued the engine to the top fuselage half, and glued part C16 to the bottom of C15. Next I assembled the forward intake pieces and connected them to the aft intake duct. After inserting the drive shaft leading from the engine to the lift fan through the intake ducting I assembled the lift-fan and attached it to the upper-fuselage half as well. Note that the connection point of the lift fan and its drive shaft is too big to fit into the shaft end. Since it is not visible, I just removed  the connection point.

I was now left with three main assemblies: the top fuselage half with the cockpit, engine and intake, and lift fan; the lower-forward fuselage with the nose gear well; and the lower-rear fuselage with the closed weapons bays and main gear wells. Putting these parts together was then quite simple. First I attached the lower-forward fuselage piece to the top fuselage piece by inserting the aft end into the slots in the inner intake parts and then gluing the pieces together. Then the rear-fuselage piece was glued into place being careful to get the guide pins of the engine in the proper place.  The bottom piece did slip a little on the starboard side, despite my best efforts to clamp it in place, causing a gap with the upper wing seam. I filled the gap with with a strip of .015" styrene. I glued the wings and elevons into place and left the vertical stabs off (they still need some work hiding those hideous seams and I figure that they will be easier to paint being left off).
There you have it. It now looks like an F-35B. Next up, the flaps, putting the cockpit together and painting and finishing. Until next time, happy modeling!

Thursday, April 24, 2014

Kitty Hawk 1/48 F-35B Build Review (Part I)

OK, so I wanted to give my two cents on the build of the Kitty Hawk F-35B. I've read all kinds of different reviews, some good some not, so I am going to build this thing up and find out how it goes. Pictures and captions to follow.

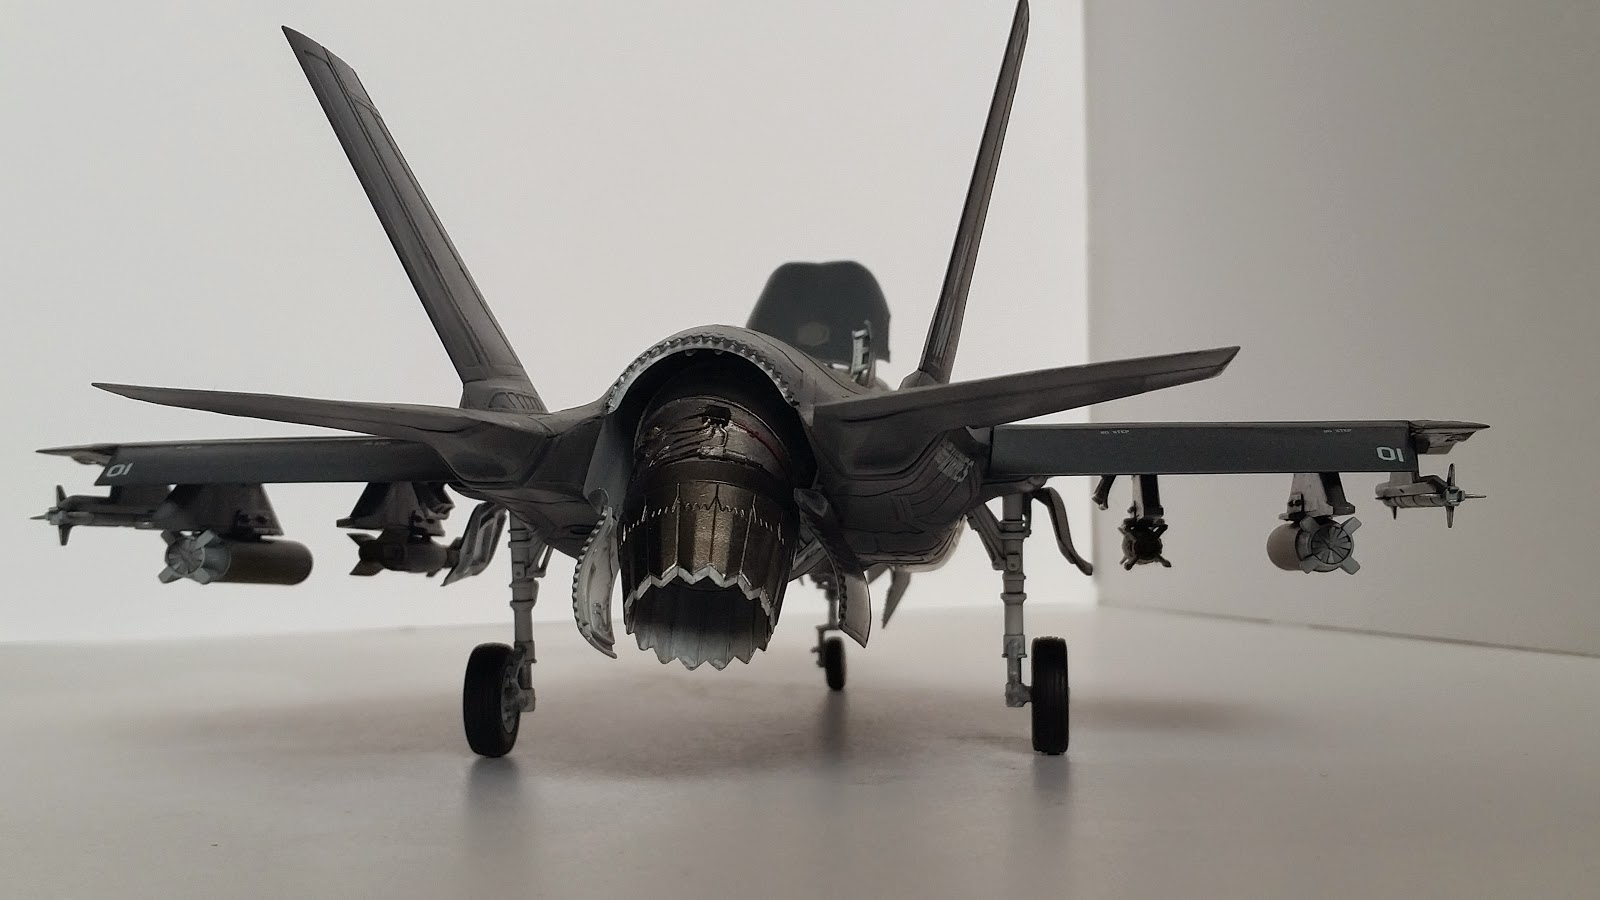
First off, every major door on this machine was molded to be in the open position. I wanted a realistic look to the model which meant that some doors would have to be closed - this could be dangerous since, when it comes to models, separately molded doors rarely fit in the closed position; more on this later. I decided on displaying my Lightning II in the take-off configuration: landing gear extended, auxiliary lift fan engaged (with its accompanying doors open), engine exhaust at about a 45 degree angle, flaps/slats down, weapons bay and canopy closed with pilot (un)comfortably seated in the cockpit.

The first step in the build I took was to assemble the pieces that didn't need paint; this meant the inserts of the elevons and vertical stabs, etc. and to close the weapons bay. I like the idea of the smaller inserts for the stabilizers and such, but I didn't like the execution. The seams have a bit of a gap to fill, which may cause me to lose some of the raised surface detail, and they were in odd places. I don't understand why Kitty Hawk couldn't seam them along existing panel lines such as the rudder connection points. (Click on the images to see what I mean.)
I was concerned that the doors I wanted closed would not fit very well, but much to my surprise, they nearly snapped into place. This goes for the forward main gear doors as well (which after much photographic research I have concluded are only 
opened during extension/retraction). Even though the weapons bay wouldn't be visible, I glued the two bay tubs inside the lower fuselage piece to improve the sturdiness of the part. It should be noted that part of the reason I decided not to display the well-detailed bays was because Kitty Hawk did not provide the launch rail/mechanism or any air-to-ground weapons munitions for the bays, exposing some garishly long pegs in the bay itself. One could kit-bash or get some aftermarket parts for this, as I have seen, but I wanted to keep this as much of an out-of-the-box build as possible, with a few exceptions I will discuss later.


Another thing that needs addressing with this kit is the main wing join. Kitty Hawk engineered the contact point with female pegs on the lower fuselage piece and female pegs on the upper wing halves. When test fitting this, it seemed that it would kind of work, but the seam on the underside of the wings had a slight step and I just didn't trust that the contact points provided enough surface area for the glue to make a strong weld. My solution was to first trim down by a slight amount the pegs on the lower fuselage part so that the step disappeared, and second cut small, short strips of Evergreen styrene and attach them to the fuselage and wings in an alternating pattern so that they would interlock together when attached. If nothing else, this eased my anxiety over the strength of the weld because the wing pieces held really well when I dry-fitted them.
 
Speaking of dry-fitting, once the glue had dried, I dry fitted all the major pieces together, and the overall fit appears to be really good. I don't see any major gaps and the wing seems can be blended easily. One criticism of the surface detail is that Kitty Hawk has engraved riveting on the skin of the aircraft. Since the skin of the F-35 is not made of metal, there is no riveting on the skin of the actual plane. I haven't quite decided on what to do about this yet, but I will have time before I have to address this anyway.


Overall, first impressions of the kit are good. Good engineering, good to great fit in most places and surface detail (aside from the riveting and a few raised panel lines that don't exist on the real thing) seems good. I will continue the review as I go along.

Cheers